• Project Blog
  • Portfolio
  • About
  • Contact
Menu

-Kansas City Kit Company-

  • Project Blog
  • Portfolio
  • About
  • Contact
The Finished Ennis House Blade Runner Block. Created from a Mold CNC Cut on my Shopbot and Designed in Fusion 360

Blade Runner Concrete Block from a CNC Mold

July 13, 2018

I recently found time watch Blade Runner 2049, and decided to create my own version of the famed 'Blade Runner Blocks.'

History of the 'Blade Runner' Blocks

The interior shots in Blade Runner where filmed in the Frank Lloyd Wright designed Ennis House. The house, which is broadly based on Mayan themes, is one of Frank Lloyd Wright's Textile Block houses. Like the other Textile Block houses, Ennis house is constructed from thousands of precast interlocking concrete blocks, each with a patterned unique to the project.

Ennis House has been used as filming location countless times, but is most recognized for the original Blade Runner. Its unique precast textile blocks are a visible throughout the films interiors scenes. The Neo-Mayan design of the blocks mixed with the film's moody lighting firmly establishes the films interiors in unsettlingly alien future.

Designing My Own Block Mold

Detailed drawings of the Ennis House Blocks are available, but I decided to start from a pre-existing 3D model.  Thingiverse User Keenan has created a 3D model of one of the texture block faces.  He has made it available for download and modification under the Creative Commons License, so I can download it for my own modification and use. 

Keenan's Blade Runner Ennis House Tile page on Thingiverse

With the Keenan's original SketchUp file imported into Fusion 360, I converted it from a Mesh into a BRep. This make the 3D model much easier to edit. To do this successfully, you'll need to be in the 'Model' workspace with design history disabled. (It should already be disable when you opened the imported SketchUp File) Left click the MeshBody in the Navigator menu and select the 'Mesh to B-REP' tool.

Changing a Mesh to an editable BRep body in Fusion 360

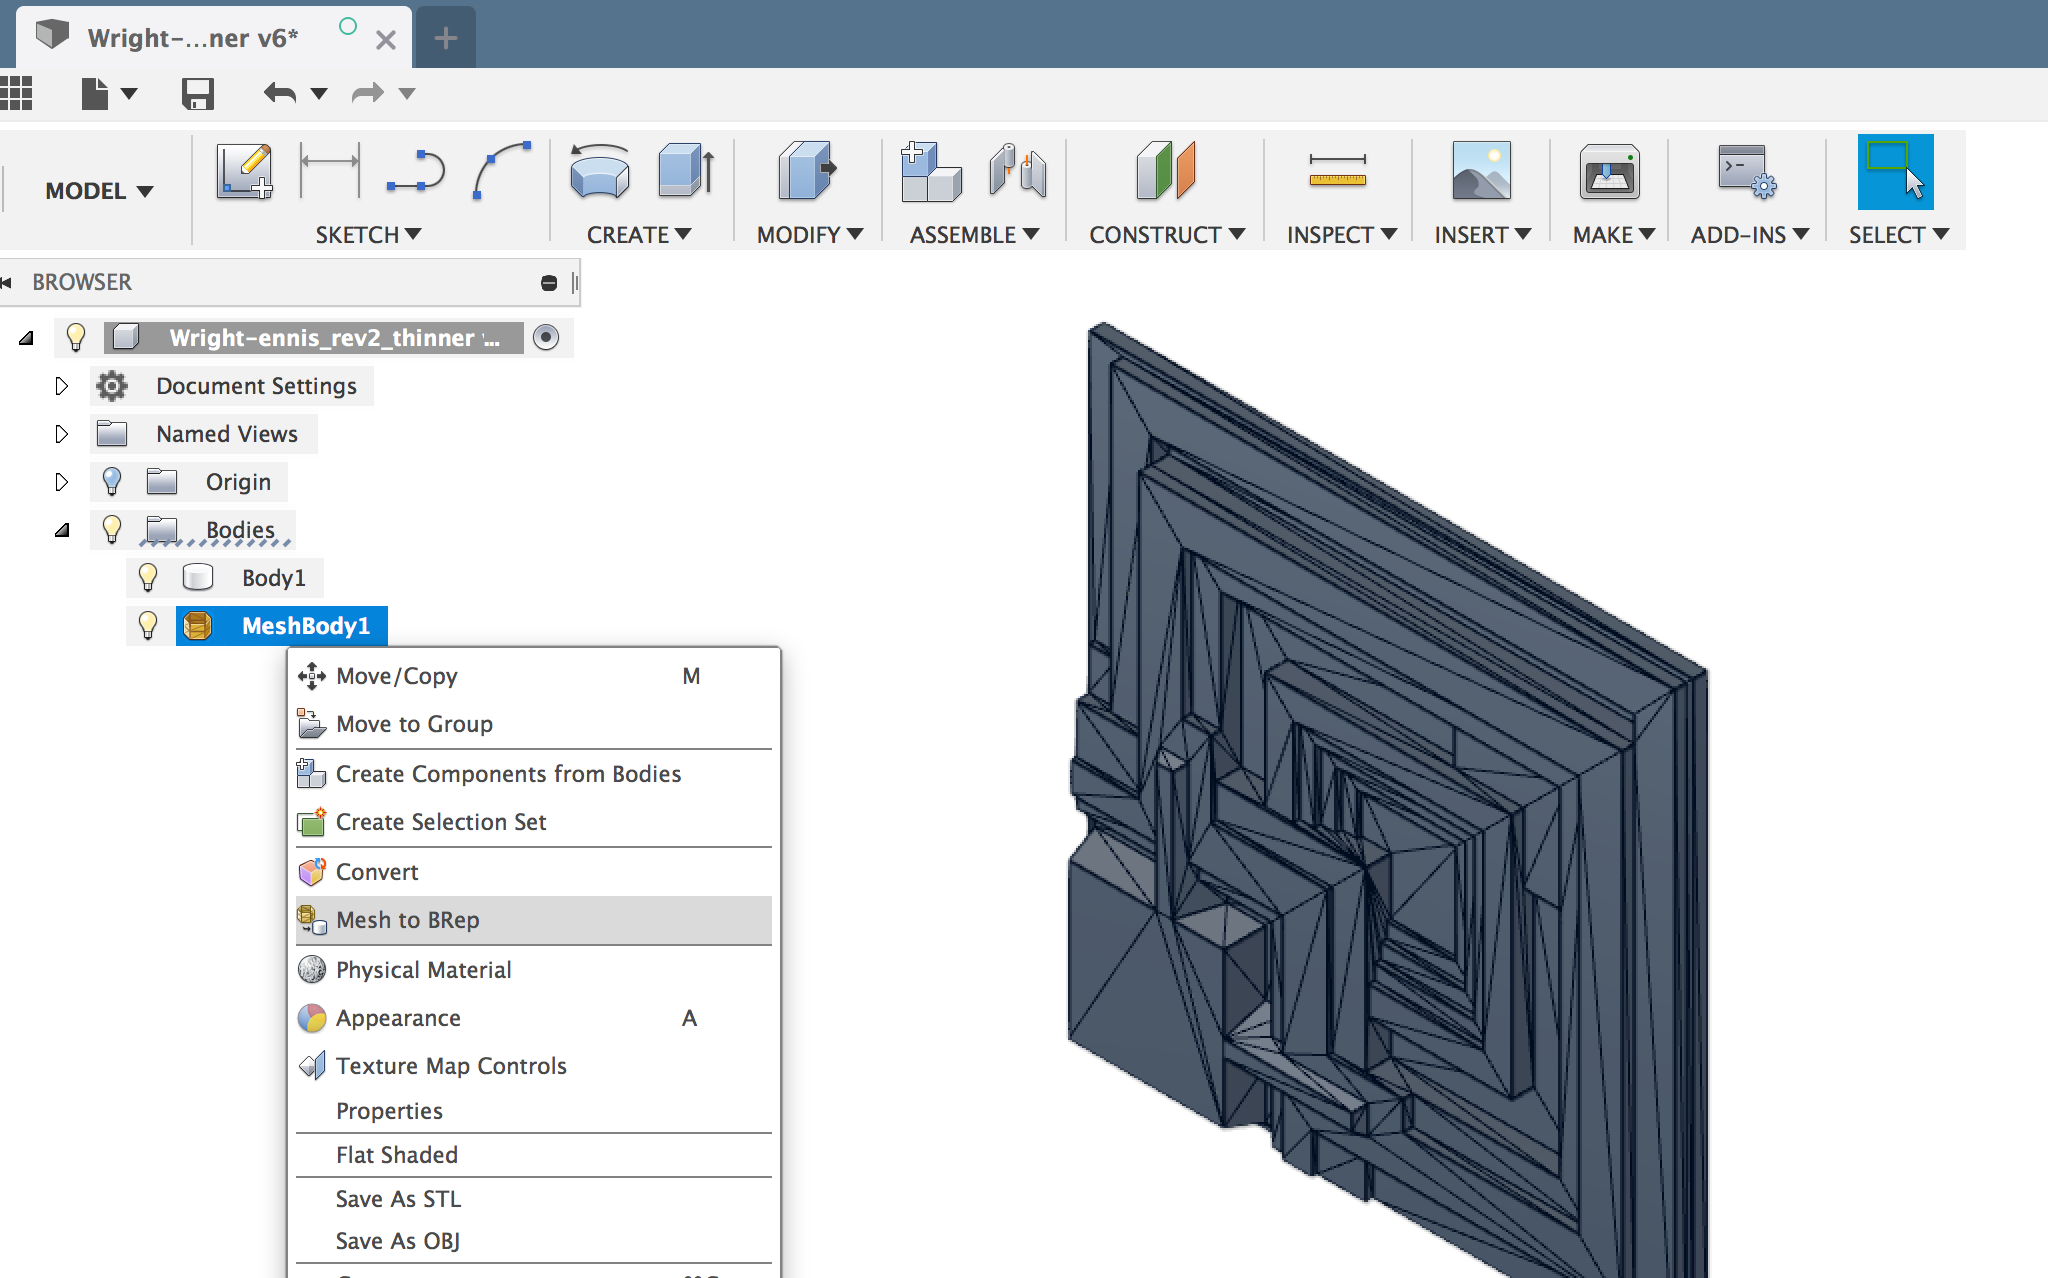
Once you have your BRep, remember to re-enable 'Capture Design History' by left clicking the root of the file's navigator tree and selecting 'Capture Design History'

Turning on the 'Capture Design History' Feature in Fusion 360

To make a mold for the concrete block, I needed to inverse the surface of the block into the wall of the mold. Easy to do using Fusion's 'Combine' Tool.  

The Ennis House Block's shape Inverted into the surface of the mold to create a negative pattern.

The Mold will make a cube, with every side textured. So with each of the six sides being identical, I only need to draw one side! Computers are great for being lazy!

CNC Tool Pathing

The Tool Path for this file is straightforward.  First we'll mill all of the horizontal faces with a 3mm flat endmill, then we mill the walls and mold edges with a 3mm ball endmill.

I used Fusion 360's CAM Pattern tool to duplicate the G-Code 6 times in the machine's Y axis, so all 6 mold faces can be milled at once from a single 18mm thick pine board.

Fusion 360 CAM Pattern tool used to reproduce the same mold face multiple times

Be sure to check the 'order by tool' option box, so the machine will run all of the operations on all of the tiles that use the same bit before stopping for a tool change.

CNC Cutting time for all six mold faces was approximately 2 hours.

Finishing the Mold 

Straight out of the CNC Machine, the pine molds are going to need some smoothing before we can cast them in concrete.

The Un-sanded Mold faces after being CNC Cut

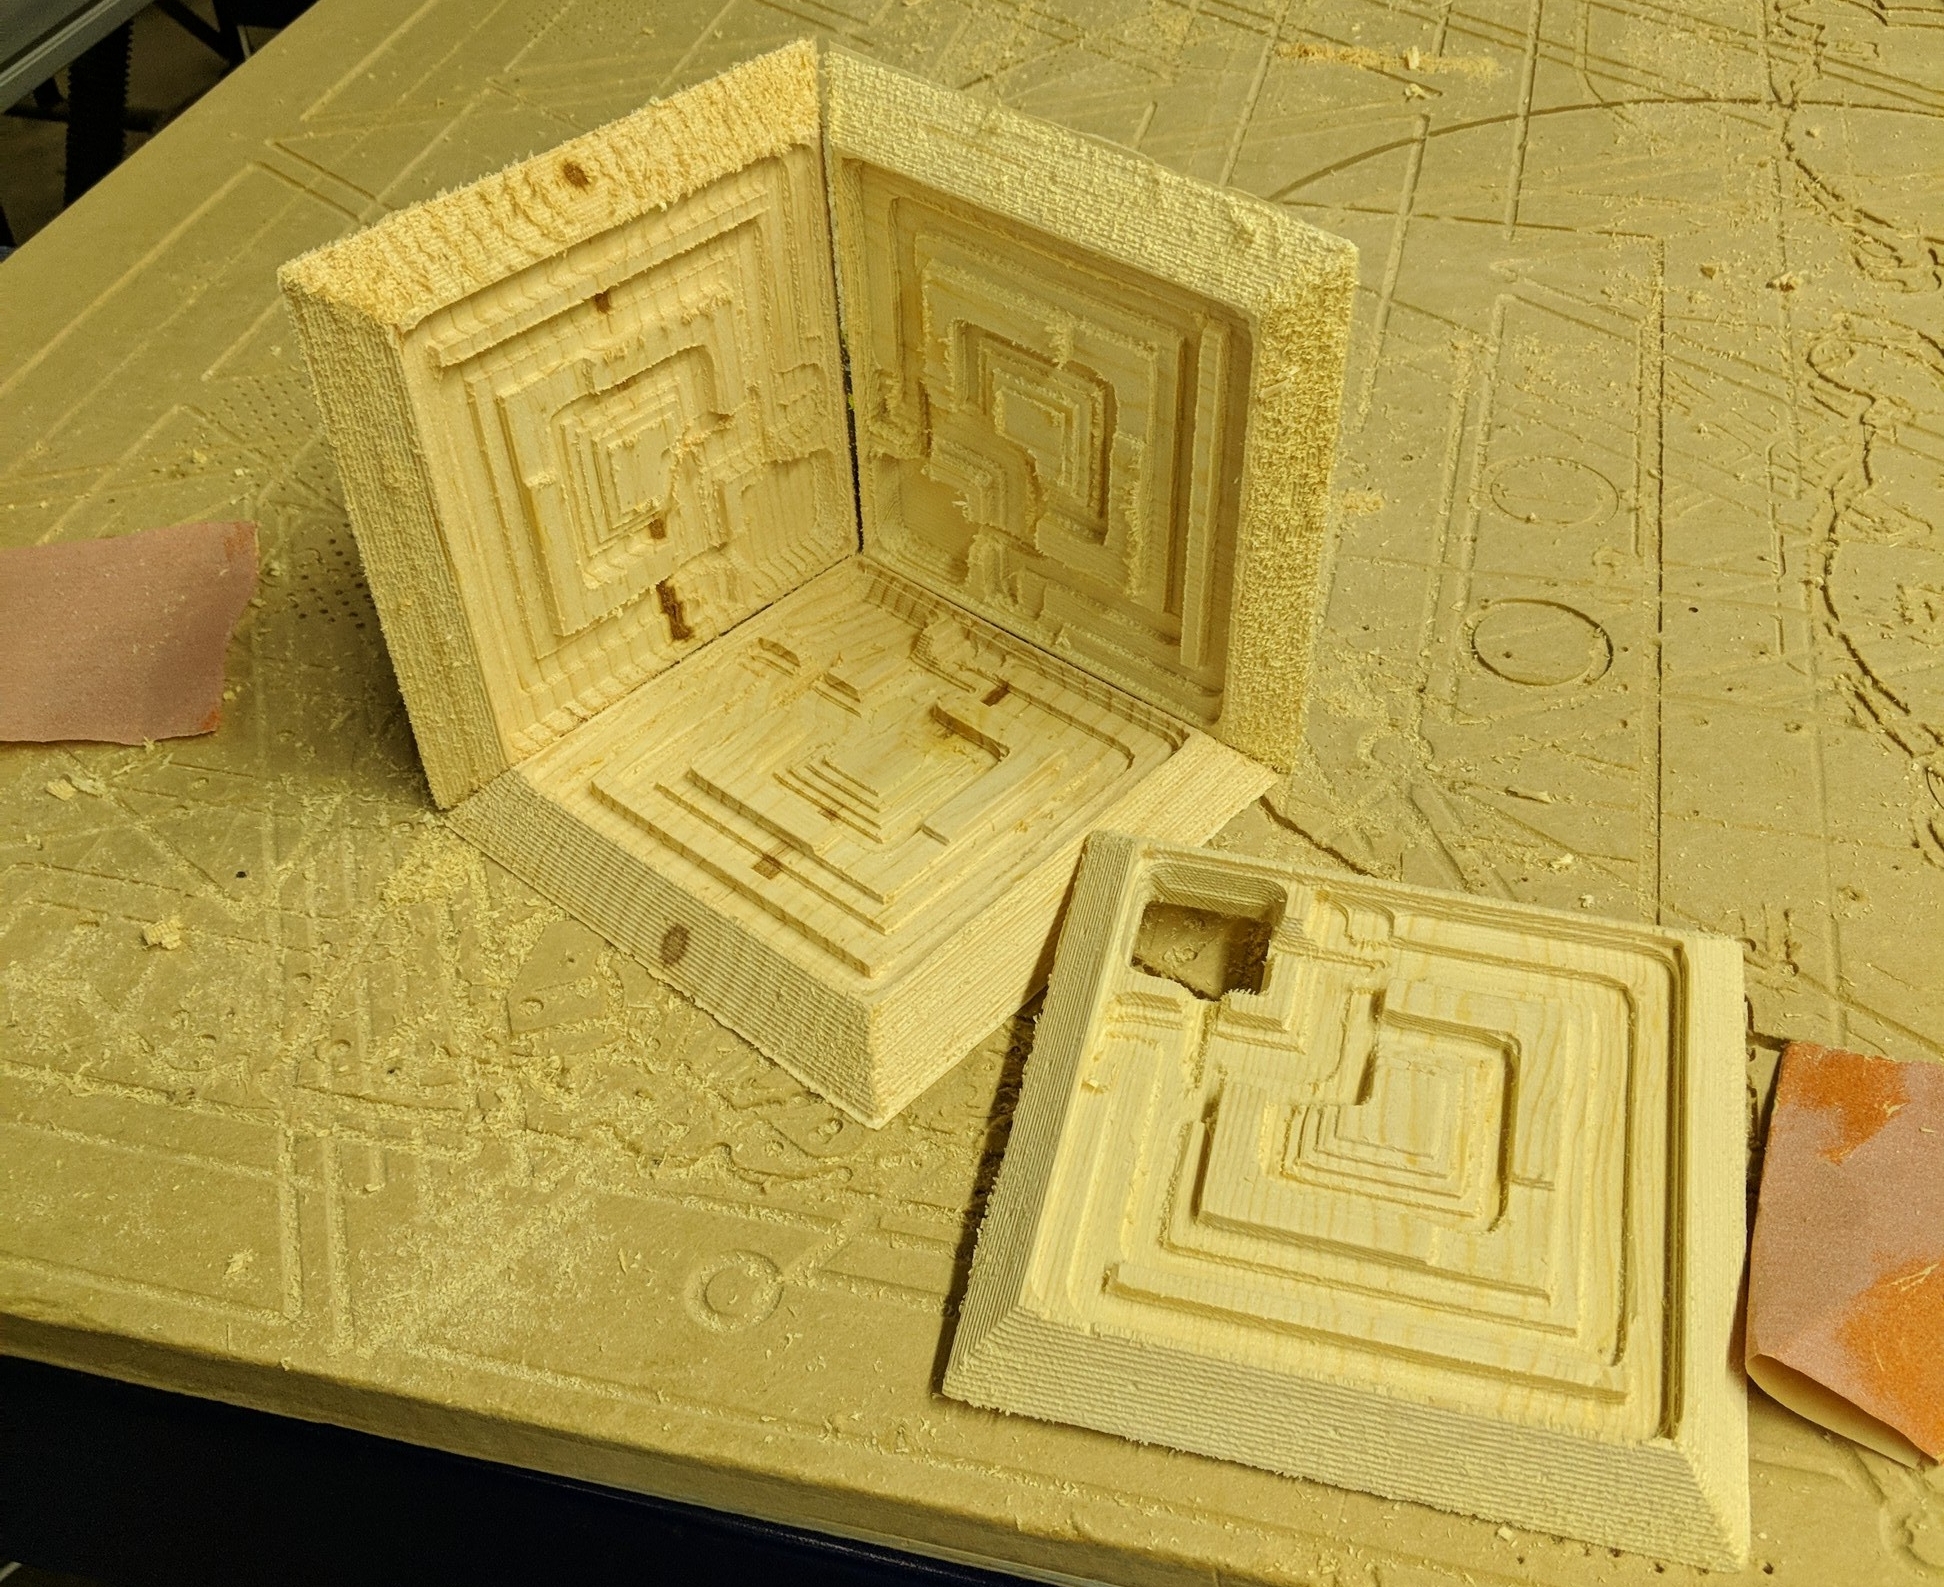
I could spend hours painstakingly sanding them, but this is intended as one time use mold so I don't want to invest that much time in it.

So after a quick sanding to remove the big stuff, I resorted to and old method to get rid of the small fibrous left overs...  FIRE!

Cleaning up the Ennis House Blade Runner block mold sides using fire from a blowtorch

The blow touch flame burns away the rough areas, and leave a smoother surface behind. Just be sure to have a spray bottle of water handy to stop the flames if the get out of control!

The Finished Flame Polished Ennis House block mold ready to have the top added and be poured full of concrete

Casting

I mixed the concrete fairly wet, so it would flow easily into the mold. There is no way around the how messy this process is.

All of the mateials ready to cast concrete in the Ennis house Blade Runner Concrete Block mold

I used a Hammer to bang on the sides of the mold after poring, to drive the air bubbles out and make the final block uniform in color and texture.

The Ennis house Blade Runner Block Mold filled with concrete and setting

Opening the Mold!

This finished mold and the tools that will be used to open it after the concrete had set for 24 hours

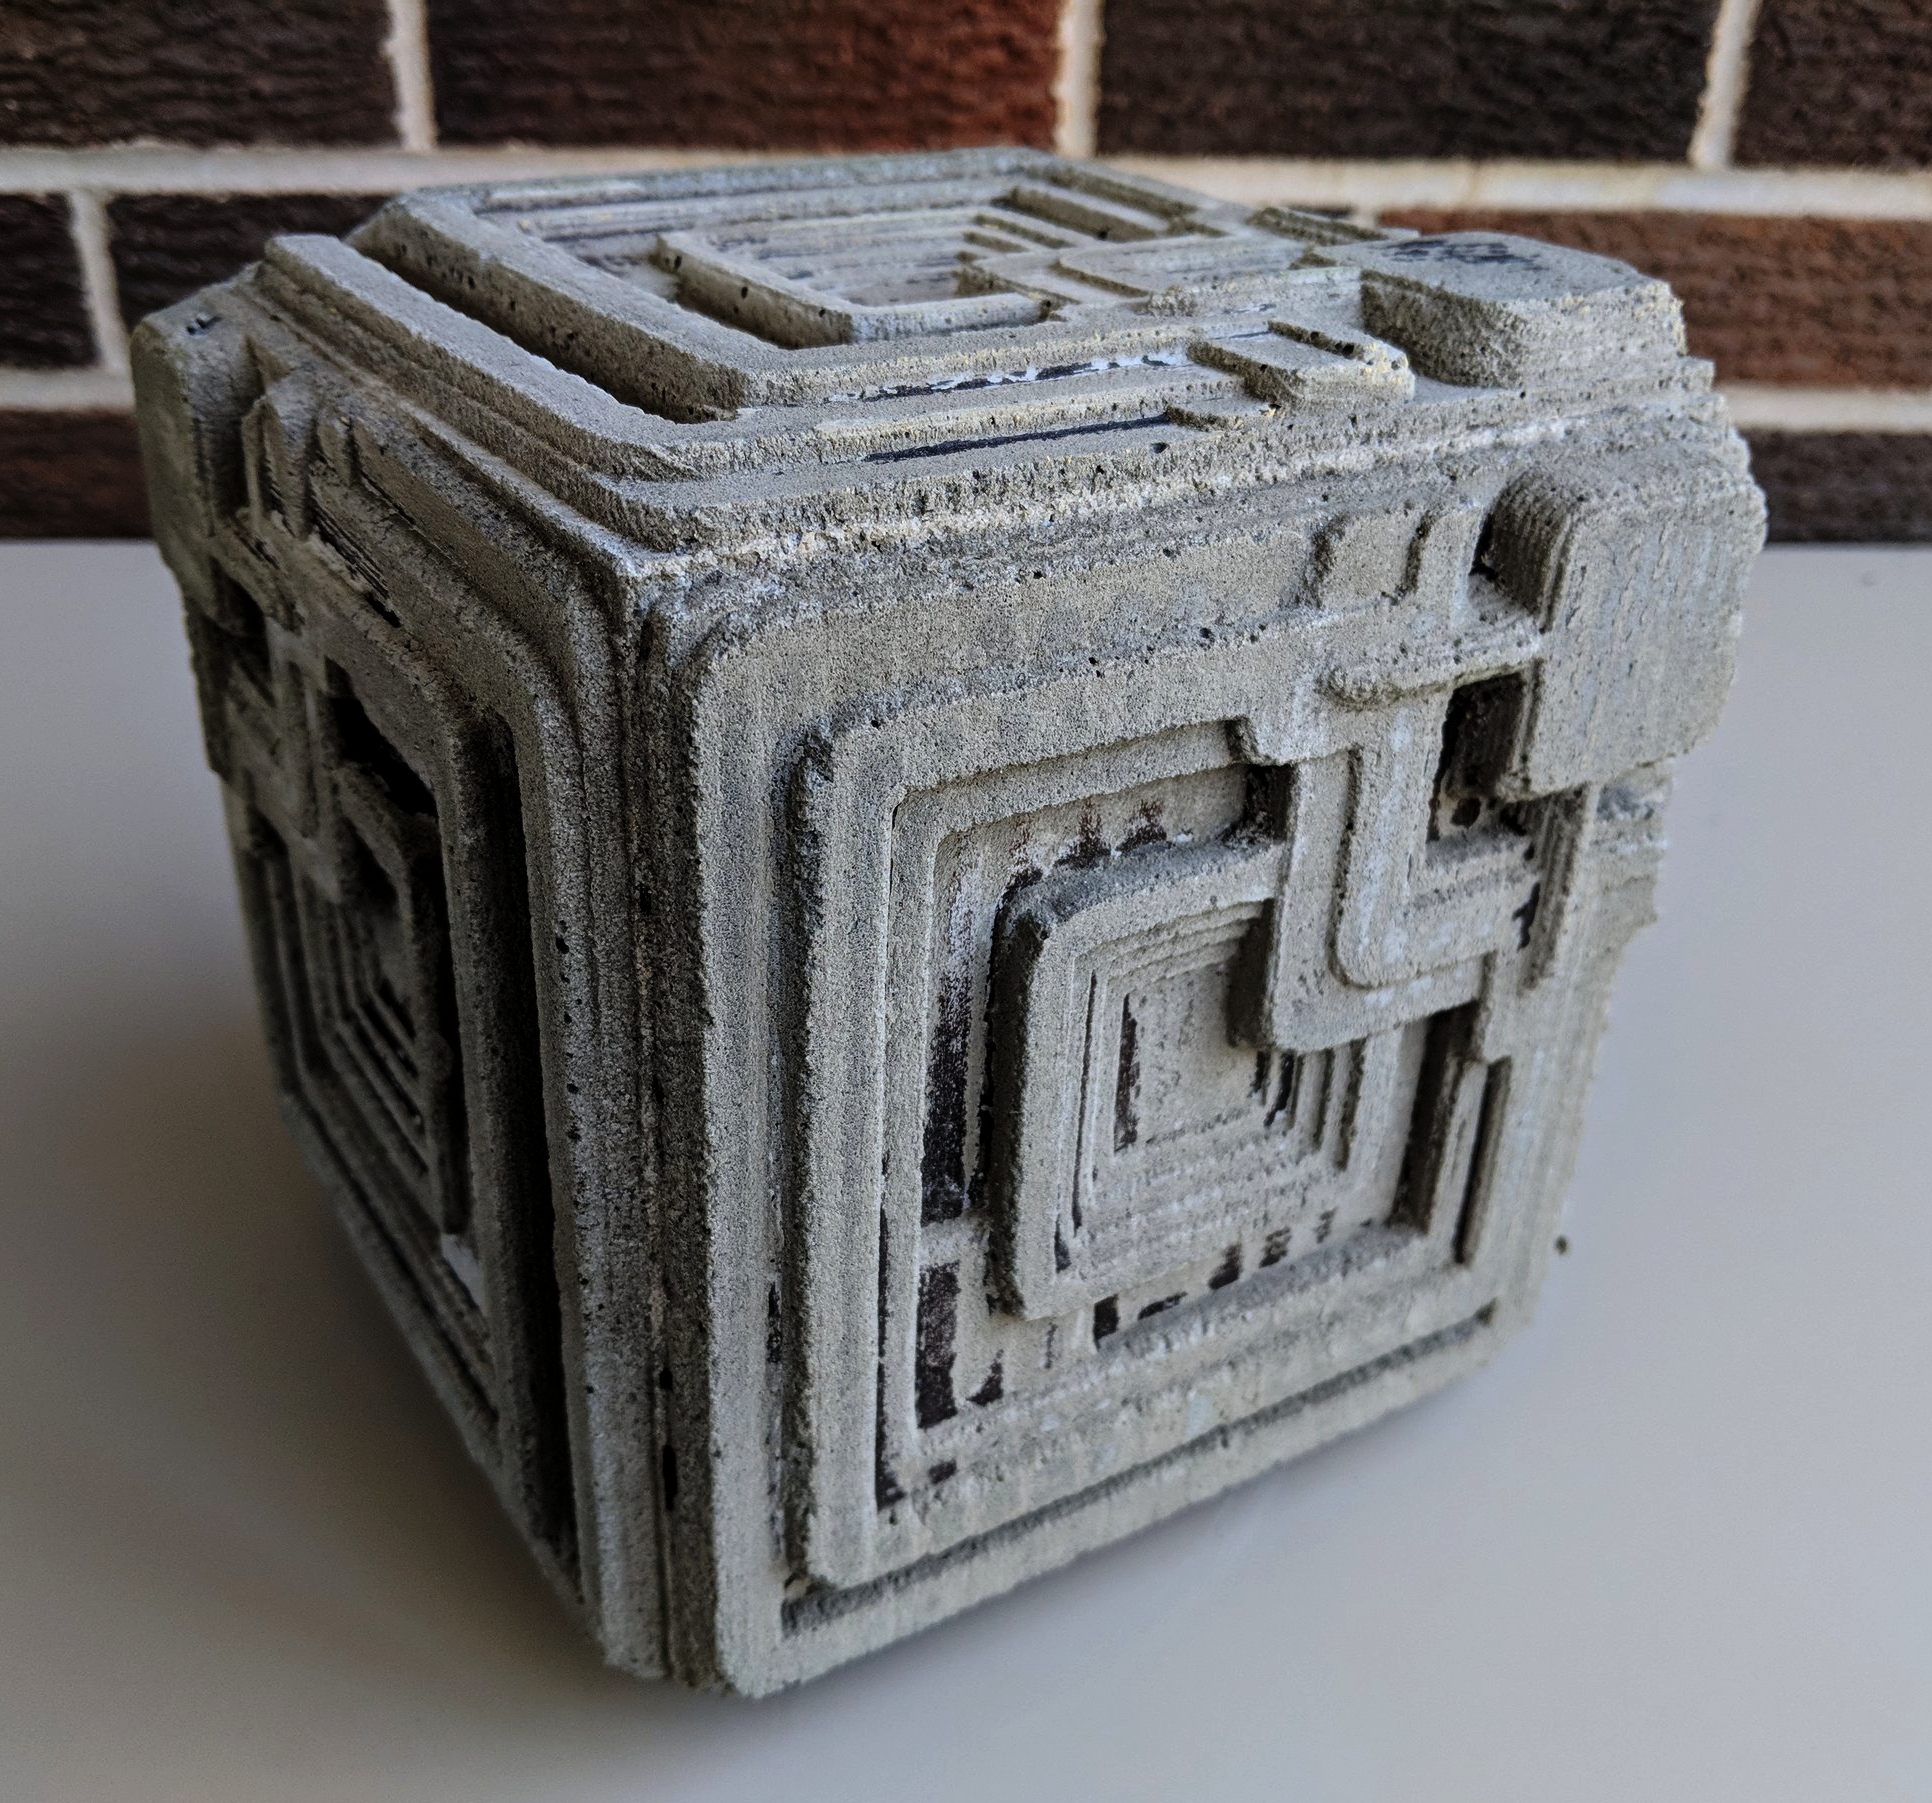
After Curing overnight, It was time to see our final Blade Runner Block. Opening this mold required a hammer, chisel, and crowbar. After 24 hour in contact with wet concrete, the soft Pine had become wet and soggy, there was no saving it.

The Finished Blade Runner Ennis House block after demolding

Now that is awesome!  The charred surface of the pine stuck to the concrete in a few places, and there are a few minor bubbles, but overall its an excellent result for a one day project.  The rough texture of the concrete came through in a few places, just adding to the block's appearance as an aged relic.

Final Notes

Where I doing this project a second time, there are a few thing I would change. Most are related to the casting process.

  1. I would use 'Topping Mix' instead of the Portland Cement I used in this cast. Topping mix will more easily fill the mold and is intended to be mixed wetter without degrading.
  2. I would pre-coat the inside of the mold with a combination of water and a surfactant like 'Jet Dry' before pouring the concrete. The surfactant would help element some of the smaller air bubbles.
  3. I would redesign the mold with an internal cavity on one side instead of making it a sold cube. That way it could be used as a flower pot... At this point the only use I can find for this 8kg block of concrete is as a really awesome doorstop!

Thanks for reading! I hope you are making something awesome!

-Michael 


In Molding & Casting Tags Casting, CAM, CAD, CNC
1 Comment

Ed's Roadster Factory Sign, An Experiment in 3D CNC Milling with Fusion 360

June 19, 2018

Over the last few months, I've been working to rebuild a ShopBot Alpha CNC machine that Hammerspace Workshop received as a donation. The machine was only a frame when we received it, so its been a long road to collect all the parts needed to get it running again.

In rebuilding this machine I've had an eye towards experimenting large scale 3D milling operations.  The ShopBot Phoenix is much lighter then our other CNC machine at Hammerspace, letting it run at feed rates 3 to 4 times faster, but can't take as deep of a cut per pass.

With everything finally assembled, and some small test jobs under my belt, It was time to try something more ambitious!

My father restores Little British Sports Cars as a high level hobbyist. He tracks down hard-luck cars in need of heavy mechanical work, gets them back into working order, then sells them on to other enthusiast looking for mechanically solid project cars. Its not really a business, more of a personal mission to save cars from being parted out and sold on Ebay.

A hobby that cool requires an awesome sign! So I decided to use my newly resurrected ShopBot 'Phenix' to 3D carve one for him as a Fathers Day Gift.

3D Modeling the Sign in Fusion 360

The sign was designed in Fusion 360, which has become my CAD platform of choice in recent months. Fusion 360 integrate CAD and CAM tools into a single piece of software, making projects like this one much more approachable.

The 3D model needed to respect a few basic principles.

  1. No Undercuts! The ShobBot Phoenix is a 3 axis machine so it can only carve straight down in the Z axis.
  2. No Small Details! Life is too short use bits smaller then 3mm
  3. Had to fit within a 24" x 24" x 4" volume. The size of the prepared MDF Blanks I had on hand from an earlier project

3D CNC Milling the Sign with Toolpaths from Fusion 360

The 3D milling Toolpaths in Fusion 360 where divided into 6 operations using 4 different tools. We'll look into each of them individualy here.

 Clearing - Pass #1

- 1/4" 2 Flute Ball Endmill -

The goal of this pass was to cut away the majority of the the material to be removed, and provide space for the tool/collet/spindle body to access the lower levels of the part in subsequent operations. For this Operation, I used a Pocket milling path with the spindle running at 12k RPM, a cutting feedrate of 210 Inches Per Minute (IPM), and a stepdown of 1/2 inch. The 'Stock to Leave' is set to 0.1 of an inch, leaving enough material behind for subsequent passes. The bottom height of this path is set to 1 inch above the bottom of the model, so this path dosen't get bogged down in any of the more detailed areas that can be handled without pre-clearing.

The 1/4" ball endmill is almost 3" long, giving it the ability to access much deeper into the block then the 3mm endmill that will be use for the final detail paths.  To provide access for these later tools, I set the machining boundary to 'Silhouette' with the tool on the outside, and added and additional offset of 1.25"

Cutting this path took about an hour and a half. I think the machine could have handled a higher feed rate. Next time I'll try something in the 250 ipm to 275 ipm range.

Rough Contour - Pass #2

-  1/4" 2 Flute Ball Endmill -

Using the same endmill as the first path, this second path refines the shape of the sign down to 0.05 inch from the final surface, clearing most of the remaining spoil material.  For this path, I used a Spiral milling path, will machining boundary to 'Silhouette' with the tool on the outside, and and additional offset of .05 inch.

This path took about 30 minutes to carve at 210 ipm.

Flat Surfaces - Pass #3

- 3mm 2 Flute Flat Endmill -

To carve the final detail on the sign, I switched to using 3mm endmills. This first finishing pass is with a flat 3mm endmill, to smooth the tops of the leters and other areas. 

An important note: I have found that most of the inexpensive end mills sold as being 1/8 inch are really 3mm.  Its always good practice to verify specifications before using any tooling. 3mm is a far more common available size globally than 1/8 inch making it much less expensive. I speculate we'll soon see the same thing start happing with 1/4 inch and 6mm tooling.    

The path was generated as a Horizontal milling path with the spindle set to 10k RPM and traveling at 120 ipm.

This path took less then 15 minutes to complete. 

Final Contour - Pass #4

- 3mm 2 Flute Ball Endmill -

The Final 3D contour pass carved the majority of the sign's final surface. This path was a 3D Contour pass with only basic modifications. The speed was set to 120 ipm, the RPM to 10k, and the bottom of the pass was offset from the bottom of the model by 0.4 inch. This offset keeps the sign firmly attached to the rest of the mass of the blank, and is designed into the model as a straight 1/2" vertical depth all the way around the model.

This path took more than 5 hours to carve.  Honestly, I should have run the machine much faster then 120 IPM, but those little end mills are so easy to break that i've become a little paranoid.

Projected Line - Pass #5

- 3mm 2 Flute Ball Endmill -

Rather then model the elements of the billowing UK flag into 3D, I used a really neet milling trick Fusion 360 can do called 'Project'. A project operation takes a flat line from a sketch, and mills it into a selected surface by a specified depth.

This path took less then a minute to cut, as was so much easier then trying to build all of that contour into the 3D model.

Outer Contour - Pass #6 

- 1/4" 2 Flute Ball Endmill -

This final path was a 2D contour used to cut the sign free from the remains of the original block. I used tabs, but they were likely unnecessary.

This path only took a minute or so, and was followed by sanding... lots of sanding.

Painting

Painting the sign was a fun and fairly straightforward task.

After an initial sanding, I sprayed the sign black to seal the surface before sanding again.

A final coat of black formed the base of the color. The areas that are going to receive bright colors where brushed in with a base coat of white acrylic. 

The remainder of the color was brushed in with thick body acrylics, then a sealing coat of clear was applied. 

Finaly, high quality metal effect paint was used to paint the boarder and raised letters. This paint must go on after the clear to keep its shine and pearlescent effect.

Lessons Learned

I wouldn't use MDF again. I had been advised this before hand, but it was the material I had on hand, and this was a non-revenue project.  The final surface of the MDF really left a lot to be desired. Even repeated cycles of sanding and sealing couldn't fully smooth the final surface. 

In the future, I'm going to look at different types of wood, or possibly a machinable foam board products for doing this type of work.  One idea i've had is to build up the blank from multiple layers of different woods, then carve down to each layer to create a multicolored 3D object.

I will also push the machine to run faster in the future. I honeslty think in soft material and a 1/4 inch bit, this machine will happily run at more then 250 IPM.

Thanks for Reading! I hope you are Building Something Awesome!

-Michael


In Fusion 360, Milling, Painting & Finishing Tags CNC, Painting, Hammerspace
2 Comments

More Recent Creations

Project Blog
Blade Runner Concrete Block from a CNC Mold
about 6 years ago
A Parametric CNC Chair In Fusion 360
about 6 years ago
Ed's Roadster Factory Sign, An Experiment in 3D CNC Milling with Fusion 360
about 6 years ago

ABOUT - CONTACT - PORTFOLIO -

Powered by Squarespace.